DESIGN EXPLORATION - TASK 2
DESIGN EXPLORATION - TASK 2
10TH OCT - TBA (WEEK 8 - WEEK 14)
NG VEYHAN (0349223) / BACHELORS OF DESIGN (HONS) IN CREATIVE MEDIA
DESIGN EXPLORATION
ASSIGNMENTS DOCUMENTATION
Instructions
Process
As an open-ended project, I wanted to explore methods of animating that I hadn't much experience with yet. One technique that I've been eager to try recently is Live2D animation. Often featured in game illustrations, they make static scenes feel much more alive with the inclusion of movement. Till now I've understood that its principles rely on layers that stack on top of each other to create an illusion of depth but the mechanical execution was something I wanted to learn.
(Fig 01, Live2D Artwork Example from Blue Archive)
Or in more recent years, there has been a boom in popularity for Vtubers, personalities with a 2D avatar that are capable of responding to live inputs. With my slight interest in character design, I would choose creating a Live2D model as my pathway for this project. However this would require additional work as rigging these models for omnidirectional movement is more complicated.
Expanding on the design created in the previous task, I continued with making a character that had a space motif along with the phoenix, a mythological Chinese animal associated with luck. Beginning with the character design, I wanted to start by trying out different hairstyles and seeing what personality it brings out. Considering the "classy and fun" approach to the watch design previously, I wanted a hair style and face that conveys that.
Long and straight hair lends a more elegant aura, but a design with overly straight hair doesn't have much flair to it. A short-haired design gave a more tomboy-ish look to the character which wasn't what I was looking for either. I tried one with a long wolfcut as it was what is currently trendy in actual fashion. It lent itself quite well to this character, with a mature yet unkempt appeal. Layering some different colours with this haircut, it gave flow to the look of the hair.
(Fig 03, Hairstyle Testing)
Another part of the character that I had to work on was the clothing for the character. Complementing this trendy look, I tried to make a streetwear-inspired bomber jacket with badges and patches from space agencies, which are an actual fashion item. However when I continued developing this outfit, I found it rather difficult to incorporate the design of a phoenix into it, thus it was put on hold.
(Fig 04, Early Streetwear Sketches)
(Fig 05, Dress Reference from Honkai Impact 3rd)
Drafting up a character sheet, I designed a dress which was quite a mish-mash of my inspirations. I felt that gothic dresses were quite prevalent, and it creeped into this design with the phoenix feathers forming a half-cape on the back of the character. The dress also featured a long flowing sleeve reminiscent of old Chinese courtesan dresses, however its contrasted by the modern dress and style of the character.
(Fig 06, Character Model Sheet)
Drawing up the different parts of the Live2D model was arguably the simplest part, as it was similar to what I've been already doing, but also the most time consuming part, a great amount of attention was required to make sure the layers were made correctly, that they blended together properly and wouldn't cause any clipping issues.
Many of these parts were also drawn quite oddly, with irises in the eyes extending above the eyelashes, as normal illustrations wouldn't do so as eyes are hidden under the eyelid. In order to create a model with smooth movement there also needed many strands of hair to be drawn, and with time constraints I wasn't able to draw as many as I'd like.
(Fig 07, Drawing Live2D model parts)
When the drawing of the model was completed, it was time to move on to the part that was completely uncharted territory for me: rigging the Live2D model. Using a program called Live2D Cubism, it can load Photoshop files and separates the layers into individual objects.
There are "parameters" that are recognized by most tracking software, such as side to side or up and down movements of the head. The aim is to recognize the extremes of the objects' movements and keyframe them, then smoothing out the movements between. For example, the eyelashes of an open eye are slightly curved upwards, and when it closes, it moves downward and curves downwards as well.
(Fig 08, Rigging Eyes in Live2D)
Mesh Deforming is another big part of animating in Live2D. Each piece of the image is turned into a flexible layer that can stretch, contract, rotate. These help simulate movement when the model moves, especially that it gives the illusion that parts such as the ears and hair feel 3D when the head turns to the left or the right, and the ear seems to grow wider as a larger surface area is visible on the side. I felt that it was most difficult to keep track of these movements when these deformers are stacked on each other, deforming an already deforming image.
(Fig 09, Mesh Deforming)
By far the most challenging part of the entire rig was the mouth of the character. As mouth movements are complicated when we speak, the model works by rigging different mouth expressions when creating different sounds from the mouth. These expressions are then mapped to two different variables of mouth movement for later when speech has to be mapped to these variables. The layering of the mouth makes it so every keyframe has to be carefully analysed to make sure none of the insides of the mouth show on the skin of the face when the lip deforms.
(Fig 10, Mouth Rigging)
It was still simple when mapping the head movements for X and Y angles. (Head rotating left to right) But when it began to include the Z angle (Head tilt to the left/right), the rig was a lot more complicated and there were a lot more keyframes to check. One unexpectedly difficult part is the hair that sits on the shoulders of the character. Since it doesn't move at the bottom, the hair sometimes doesn't track properly with the back of the characters head.
(Fig 11, Rigging Back Hair)
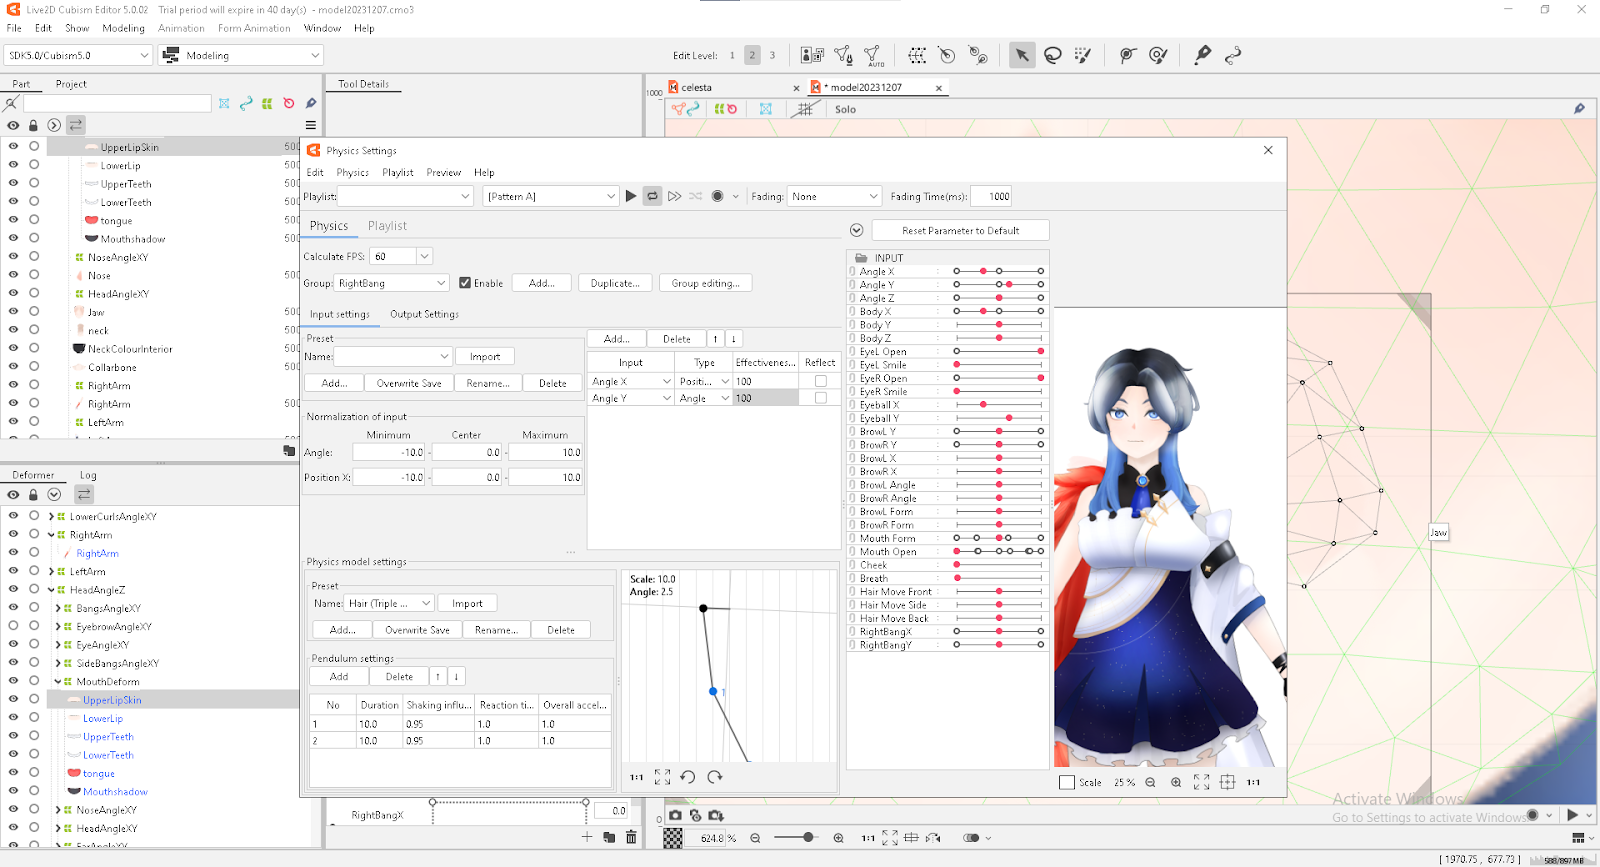
Once the rigging of the model was complete, it could respond to movements that are tracked from a user. However, there were also movements that are caused by this input such as hair swaying when turning the head. I worked on adding physics wherever I could to the character. For the hair, I added a new parameter for the hair to sway, and this was controlled by momentum generated by head movement. In other words, the head moving causes the hair to move.
(Fig 12, Physics Settings)
Once the model was fully rigged, I exported it and got it ready for use. Vtube Studio is the most popular free option for live tracking software currently, and thus I used it for the demo. Loading the model into Vtube Studio, I adjusted some of the maximum and minimum values for certain movements, as the rigging could be too extreme or too subtle when tracking.
(Fig 13, Live2D Model Setup)
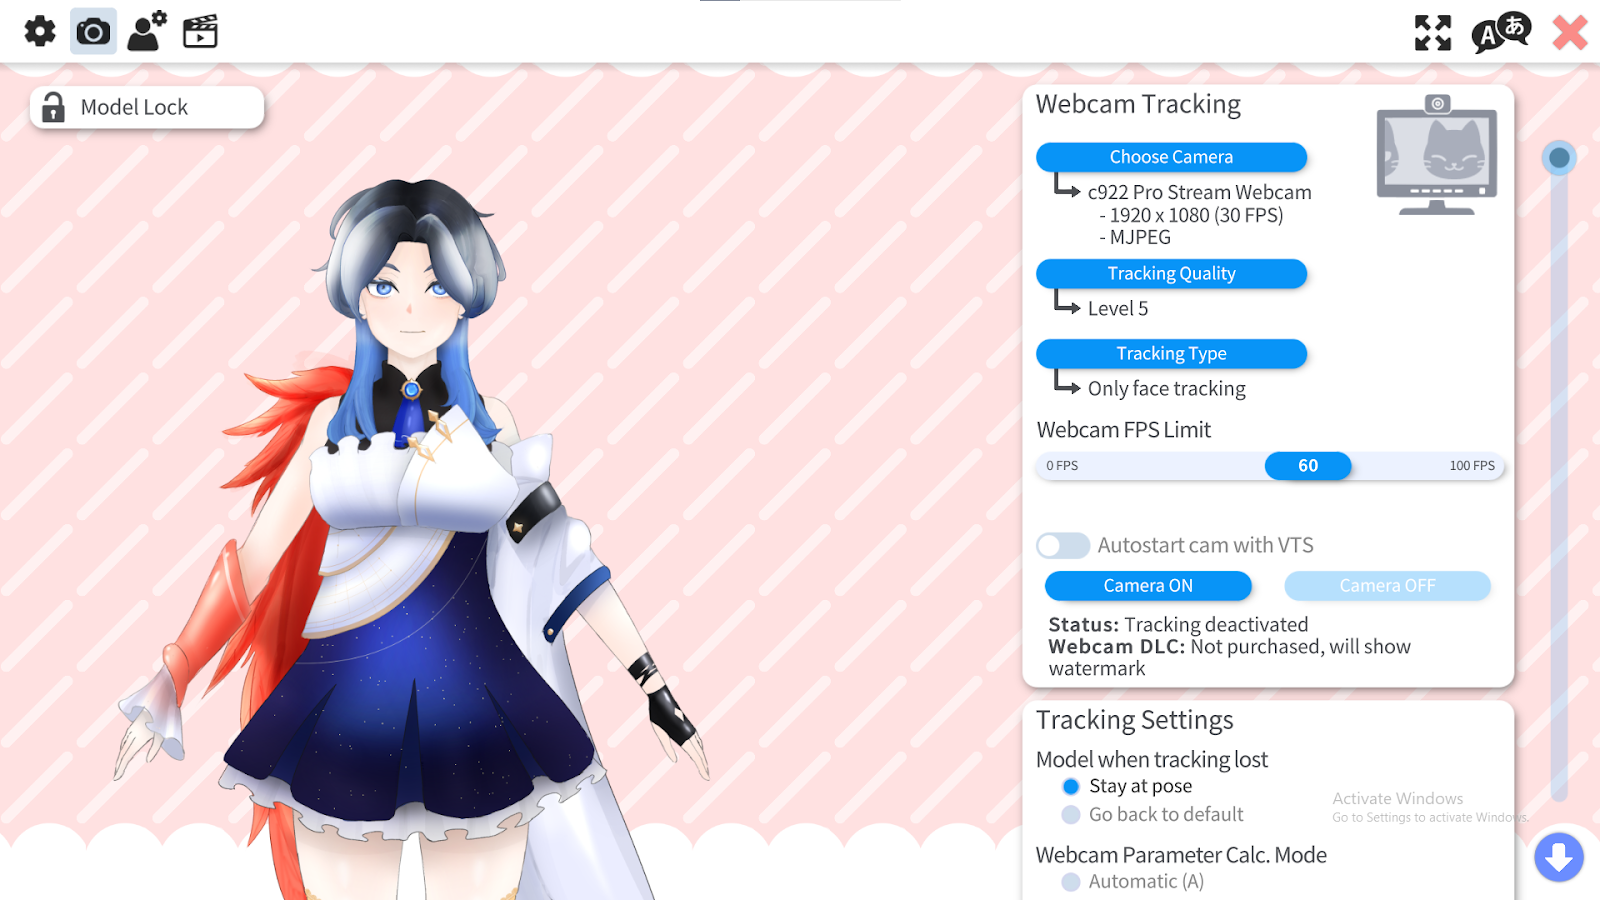
Finally, it was time to test out the Live2D model. I calibrated my webcam to my face in order to control the expressions and movement on the upper torso and head. I tried to make lipsyncing more accurate with microphone input tracking as well, however it couldn't work out. I then recorded a short video demonstrating the different movements the Live2D model was capable of making.
(Fig 14, Setting up face tracking)
After recording the video, I edited the video into a short demo reel to be used in this project.
Rationale
SUBMISSIONS:
Model:
Demo Reel:


Comments
Post a Comment