ILLUSTRATION & VISUAL NARRATION - EXERCISE 1 & 2
ILLUSTRATION AND VISUAL NARRATIVE - EXERCISE 1 & 2
April 2nd - May 2nd (WEEK 1 - WEEK 4)
NG VEYHAN (0349223) / Bachelor of Design (Hons) in Creative Media
ILLUSTRATION AND VISUAL NARRATIVE
EXERCISE 1 & 2
Lectures:
Week 1 / Introduction and Briefing
Today, Ms. Noranis introduced our class to Adobe Illustrator, the program that we will be using to create Task 1 for the next few weeks. We were also introduced to the website Blogger, which we are supposed to record our progress for the next few weeks.
Week 2 / Vormator Exercise Introduction
For the second week of Illustration and Visual Narrative, we were introduced to the Vormator project, which would be our assignment to come for the next few weeks. Ms. Noranis explained the theme of the assignment and the criteria and objective of the exercise. We sketched some initial ideas for any vormator monsters that we have come up in the meantime and presented them for critique. We also had our first meeting with our assigned lecturer for the practical portion of the lesson, Mr. Kannan.
Week 3 / Basic Background Designs
In this week of class, we were expected to have a solid idea of how the final design for the character of the Vormator assignment already. Ms. Noranis explained to the class the use of the colour wheel and how to incorporate colour harmonies such as triadic and complementary colours in order to create an overall more cohesive colour palette to be used in the final design.
Week 4 / Perspective & Rule of Thirds
For this lesson, we were supposed to be completely done with the design for the vormator character itself. Ms. Noranis introduced us to the Rule of Thirds, something that I am familiar with due to its use in other relevant classes. The use of perspective grids was also taught in order to create a sense of space in the landscape we were to create. We were encouraged to incorporate the use of these techniques in order to create a more believable landscape with a sense of depth.
Week 5 / Finishing Up
Our lecturers gave us the day off in order to focus our efforts on finishing up the project for submission.
Instruction:
<iframe src="https://drive.google.com/file/d/1QImiIWzNZBRjsSIFN_YNDEqun7xT-fR_/preview" width="640" height="480"></iframe>
Practical
(Fig 0.1, Thumbnail)
Thinking of Character Designs
First and foremost, we had to come up with a character which looks like it could belong in a card game. The twist, however, is that the designs are limited to basic shapes, instead of a free-form drawing that normally comes to mind first.
(Fig 01, Conceptualizing, 9/4/2021)
When thinking of character designs, I decided upon a character with heavy roots in dark fantasy elements, with less-than-friendly looking visuals. In the end I created the Flame Baroness design as presented above.
(Fig 02, Final Draft, 10/4/2021)
Basic Design
The body remained largely unchanged after the alterations, but in lieu of the large and bulky tail, I switched them to little "servant" creatures in the shape of fireballs, something which I wanted to convey in a "twisted tyrant" archetype of character. I also tried to keep the number of shapes to a minimum, as the limitation of simple shapes should keep the character design less detailed but still legible in a way.
Vectorizing the Character Design
I had settled on the final design of my character the previous week, however I have yet to come up with a suitable name for the character. I eventually settled on trying to implement a background for the black and white sketch that I had created the previous week.
(Fig 03, Final Character Design, 14/4/2021)
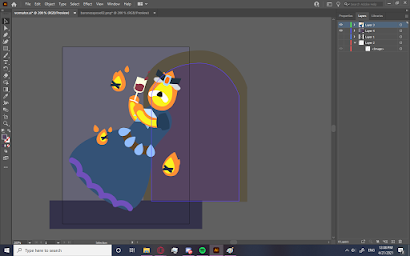
First and foremost, I had to pick a colour palette for the character. I went for a colour which would complement the warm colours of orange and yellow: blue. Cutting out the shapes and forming a design was simple enough, despite being slightly time-consuming.
(Fig 04, Vectorizing the character, 21/4/2021)
Designing the Background
Initially, the cage from the sketch was not present. I implemented the cage as a means to convey a message of "unfair treatment" that was a motif for the character. I also considered utilizing different designs for each of the individual "flameling" creatures. In the end, I decided against it as giving these prop characters too much individuality might draw focus away from the main character.
(Fig 05, Vectorizing the Background, 21/4/2021)
After completing the background, I had also done a little lighting rendering and adding little details. When I had completed the piece, frankly I was quite unsatisfied with the end result. Perhaps in the following week I would redesign the artwork with a more dynamic angle and pose, as well as design the interface of the card.
(Fig 06, Prototype Card, 21/4/2021)
Redesigning the Background
Fairly unsatisfied with the initial background and subsequently the overall design of the card, we had some guidance from Ms. Noranis regarding the conceptualization of the landscape to be used in the card.
(Fig 07, Birds Eye View, 22/4/2021)
(Fig 08, Bottom Up View, 22/4/2021)
(Fig 09, Close Up View, 22/4/2021)
(Fig 10, Overlook, 24/4/2021)
(Fig 11, Close Up POV, 24/2/2021)
(Fig 12, Top Down, 24/4/2021)
Eventually I settled on this perspective as I deemed it still feasible with the shapes that I had on hand. The flames on the ring I decided against eventually because after trial and error I deemed it impossible to create enough variations on the vormator shapes without creating a flame that looked overly uniform.
Creating the Vector Background
After the settling on the basic layout of the image, I got to work adding the vector shapes in order to create the final image. Some shapes I had to distort ever-so-slightly in to help correct its proportion to one suitable for the perspective of the image and in proportion to the characters overall size.
(Fig 13, Vectorising Character 2.0, 30/4/2021)
Creating the final character wasn't too much of a hassle at this point as I had already completed one piece from before. As such I had a clear cut idea of how I would design the character. The only portion that required some degree of consideration would be when applying shadows and highlights to the character. At that point I had not established any proper source of light from either the background or foreground, as such it took some thinking to figure out which directions to cast shadows.

(Fig 14, Final Vormator Monster, 30/4/2021)
Creating the Vector Background
Now that the monster itself was done, it was time to create the vector image of the background. First, I tackled the design of the tree the character was leaning on. It took just a few basic shapes to get the trunk of the tree done, but the roots of the tree proved to be a completely different beast. Initially, I threw out a bunch of shapes at random and decided to mix and match them together in order to create something resembling the chaotic structures that are the root of trees.

(Fig 15, Designing Roots, 1/5/2021)
I left the tree trunk without much detail at first as I felt that the designs would come after completing the basic structure of the image, which contradicts my normal work flow that I was used to. I wanted to create an area of shade or burnt grass, depending on how it is interpreted. A giant ellipse was as straightforward as it sounded. Just three or four curved shapes had gotten the job done.

(Fig 16, Grass Patch, 1/5/2021)
The background of grass that the character was sitting on was a giant flat green background, it was overly simple and I believe such a small step didn't warrant documenting fully. Now I had to fill in the details of the background. I added clumps of grass throughout the background in order to create some interesting elements in what was otherwise a background only consisting of one solid colour, I also added small flames on the burnt grass and charred spots on the trees to further sell the point of the vormator character being destructive in nature.

(Fig 17, Exported Image from Illustrator, 1/5/2021)
The lighting from the image was absolutely flat and had no expression whatsoever. I moved on to import my work into Photoshop, where I would continue to work on the lighting of the image. I added some dark vignette at the edges of the image using an airbrush tool to show some depth in the image and help reinforce the presence of the character by introducing a darker area pushing away attention.
I was also already aware of the use of colour dodge as a blending layer for strong, saturated lighting effects, which was what I was aiming for in the image. I was still playing around with the opacity of the layers to help create a more subtle effect with the lighting, as the lighting should still look natural enough but still carry a little presence of "magic" in it.
(Fig 18, Initial Lighting, 1/5/2021)

(Fig 19, Final Vormator Card Art, 1/5/2021)
Designing the Final Card
It was time to move on to the final stage of the Exercise, which was to create the card which the character is to be inserted in. At this point I had already decided on her story and all, however I had yet to think of her name. While pondering that, I sketched away at a possible card design.
(Fig 20, Card Layout Prototype, 1/5/2021)
I had no real inspiration when creating this design, I just referred to the somewhat limited knowledge I had in the field of card games, more specifically Hearthstone. I always thought that the idea that many of these card games in digital media had some form of crystal inlay which I thought was pretty neat, and I wanted to incorporate said elements in my work. Frankly, I don't have much experience indrawing cut precious stones, but I quite accurately deduced that I would draw too many reflective 'sections' on the surface, much to my amusement.
(Fig 21, Attack Stat Gem, 1/5/2021)
The rest of the card was a fairly simple ordeal, I added small shadows behind the text boxes to give the interface a little depth and outlines to make them stand out more. One aspect that I did have to alter was the borders of the image on the card. I noticed it would obstruct a little too much of the vormator character and as such I had to reduce its size to maintain clarity in the image.
(Fig 22, Final Card Design, 1/5/2021)
In the end, I was pretty happy with the result of the card. It was pretty rough around the corners but considering the technical limitations of the exercise, for a first time I believe I did fairly well, despite having much more room to improve.
Extra: Chiaroscuro
This was an extra assignment given to us by Mr. Kannan during the lesson of Week 2. I finished the assignment to get a better grasp of using the bezier pen tool during the earlier part of this assignment.
At first, I converted the reference image of myself into grayscale as to get a clear picture without any influence from external colours. Afterwards, per what I learned so far, I used the bezier pen tool to path around the subject.
(Fig 23, Clipping Mask, 21/4/2021)
I used the addition of light values over a black base (though not purely black, as it can be quite jarring) as I intended to use it as the profile picture of my blog, and it was more suitable for the theme. Portions of the image with a key light was easy to decide as an area with light values, but trying to incorporate certain details in a shadowy area was difficult.
(Fig 24, Adding light, 21/4/2021)
I was generally satisfied with the final image, but the shape was a bit rough around the ponytail at the back of the head. I also noticed facial features are also hard to replicate accurately, as it was recognizable, but somewhat uncanny. I would need to practice more and get used to making tiny details with the pen tool, which is much harder than with a standard raster format.
(Fig 25. Final Chiaroscuro, 21/4/2021)
Feedback
Week 1: I was unable to receive any feedback for this class due to my late enrolment in this course. There was also no existing work on the first week
Week 2: When consulting Ms. Noranis, she recommended that the tail of my character be removed or altered, as it gave the character an overly large silhouette on the bottom half of my character. With the piece of advice in mind, I made some alterations to my character.
Week 3: After finishing the initial background design, we were given advice on how structure the backgrounds better, as well as decide on which colours to use alongside the characters. As such I made some alterations on the work and withheld for feedback this week.
Week 4: When sketching some background perspective ideas, Ms. Noranis commended my use of dynamic angles and poses in order to tell a story in the images that I have prepared in the short amount of time we were given.
Week 5: Today was a free week, as such no class was conducted and therefore no chance for feedback this week.
Reflections
Week 1: Same reason as above, I was unable to participate in the first week of lessons, therefore I don't have any materials for this week.
Week 2: I thoroughly enjoyed the process of creating a character from scratch. The idea of conceptualizing a fictional being and bestowing a story upon said design is something that had already interested me since a young age. I am highly unaccustomed to the vector format that we are supposed to work on for this project, as opposed to the raster format which I spent a long time working on. Regrettably I wasn't able to toy around with Illustrator at the time, but I'll settle it soon and get to work on it.
Week 3: I thoroughly enjoyed the process of creating a character from scratch. The idea of conceptualizing a fictional being and bestowing a story upon said design is something that had already interested me since a young age. I am highly unaccustomed to the vector format that we are supposed to work on for this project, as opposed to the raster format which I spent a long time working on. Regrettably I wasn't able to toy around with Illustrator at the time, but I'll settle it soon and get to work on it.
Week 4: I liked drawing illustrations even before enrolling in this course, and the sketching exercises given this week was something akin to a refresher for me on how to compose shots that are expressive without the use of words or facial expressions. It did give me some vague ideas on how to reconstruct my vormator card, but I felt the limitations of shapes was still somewhat stifling.


Comments
Post a Comment